

You will need:
MATERIALS
 2 x Ikea HOL storage tables
4 x castors
wire mesh
staples
hardboard
panel pins
lino
No More Nails
pine strips (14mm x 25mm)
pine strips (14mm x 14mm)
pine edging strips (14mm x 3mm)
8 x L-shaped brackets
4 x thumb turns
4 x small basic hinges
2 x corner hinges
1 x closed screw-in hook
string
plastic litter tray
shower curtain hooks
TOOLS
 jigsaw + goggles
pencil
hacksaw
staple gun
wire cutters
stanley knife
metre stick
screwdriver(s)
hammer
-
Assemble the first HOL as per the instructions, with one change: wait until later to attach the stoppers to the lid. Turn it over and use pine strips to fill the shortest gaps between the corners, then screw castors into strips.

The front panel with insides removed, and pine strips making up the new door 
Cutting the mesh to size -
Using a jigsaw, remove inner wood from front and one end. Sand edges. Remove end panel, cut mesh to fit inside and staple on. Attach pine edging with panel pins. Screw panel back into place.
-
Remove front section. Cut 14mm x 25mm pine strip and use four L-shaped brackets to create door (right).
-
Staple mesh on inside of door. Attach door to HOL using three hinges. Screw in two thumb turns.

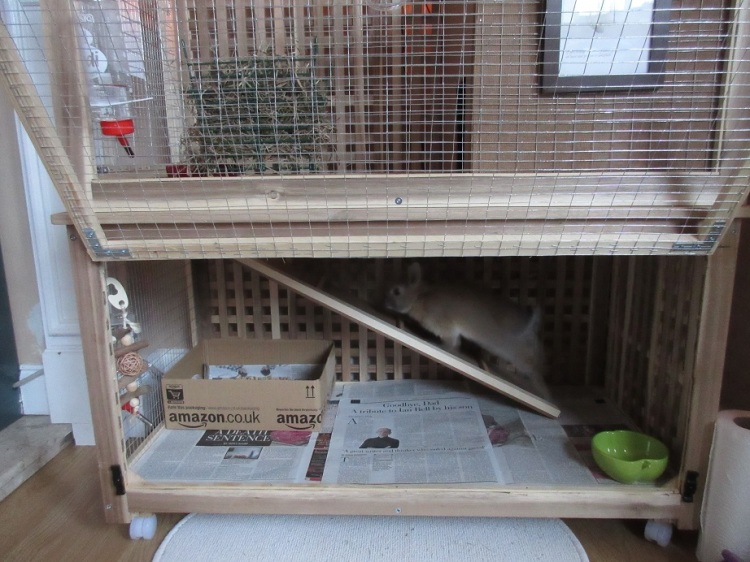
Ground-floor level complete, apart from the hardboard/lino removable base. I’ve also added very thin pieces of wood in each bottom corner, to stop the door swinging inwards. -
Cut two pieces of hardboard to fit floor, and one piece of lino. Attach lino to top layer of hardboard with staple gun. Floor will be removable for cleaning/replacement of hardboard if necessary.

Ground floor plus stairway complete. Time for a test run! -
Unpack second HOL and saw base panel in half lengthways to create stairway. Cut and glue on 14mm x 14mm pine strip using No More Nails or similar adhesive to make edge. Cut and glue on 5mm pine strip to make steps, and another piece underneath the top. Then screw corner hinges into top of end panel and top of stairway.
-
Attach small closed hook to base of edge pine. This will allow stairway to be raised (using a piece of string) to prevent access to top level.
-

Jisgawing the connecting space between ground floor and first floor. I think I ended up cutting a bit more out. Attach three out of four stoppers to lid, omitting the corner where the stairway is attached, and place lid on HOL. Jigsaw out an opening to allow access to second floor (it’s best if you switch the lid round and do the cutting away from the stairway to avoid cutting into it). Sand edges and attach pine edging with panel pins.

With edging, to make sure bunny doesn’t get any splinters coming up the stairs. -
Assemble second HOL (apart from the base, which you’ve already used for the stairway) and saw down the bottom corners so it sits flush on top of the first one. Cut two hardboard panels to make the floor of second level. Double up to make these thicker. Glue them in position, then lift off the top HOL. Cut lino to fit the hardboard panels and attach with staple gun.

These hardboard panels (fixed in position) made sure the two levels stay together and flush, despite not actually being attached. The palace comes fully apart for cleaning and transporting. -

It might seem odd to have a door upstairs, but it’s super handy for gaining access to the dining area. Using the jigsaw, remove inner wood from front and one end as with basement level, then take HOL apart, but this time make a door for the end and attach mesh (and edging) directly to the front. Attach door using 1-2 hinges, and screw in two thumb turns.
-
Use hardboard and 5mm pine strip to create
bedroom box measuring approx 43cmx37cm. Cut out
doorway. Take 42cm long litter tray and use hacksaw to remove one long edge. Insert tray into bedroom.
The bedroom box, which slides into the first floor. 
Lift the modified litter tray out for easy cleaning of the bedroom. -
Join five shower hooks together and attach to top of mesh on top level. Attach one hook to bottom of basement door. To use, join together.
- Add rabbit accessories and decorations
- Add bunny!
Edward taking the stairs 
Edward emerging from the bedroom for some hay. Use a tray to catch falling hay and also drips of water from the bottle. 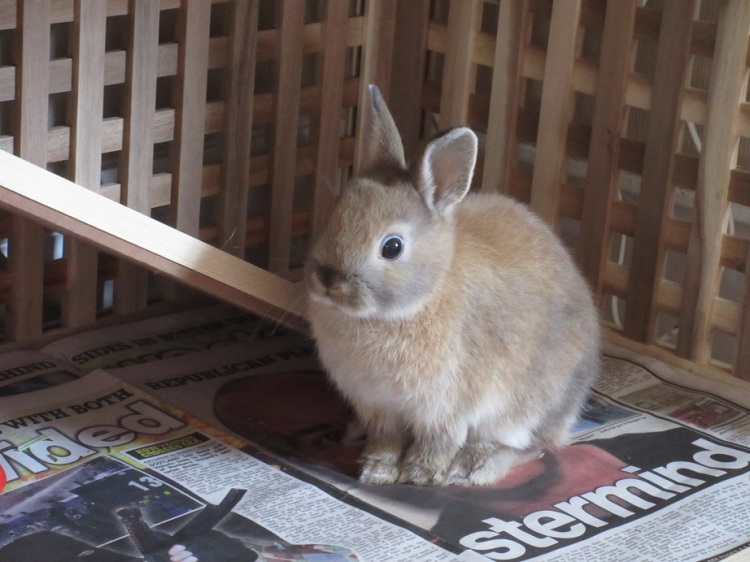
Edward is a dwarf rabbit (and just a baby here!) The Bunny Palace will be too small for larger rabbits if they will be kept in it for long periods. - I’ve also added a socket tidy to the wall side, to keep TV/lamp cables out of harm’s way:


Awsome! I need to try this!
LikeLike
What a brill idea looking in to it
Thanks for posting x
LikeLike
Thanks John! Let me know if you need any more info or tips!
LikeLike
Love this! Looking into the cost of everything. Now that you’ve had this for few years, was it worth the investment? I absolutely love it!!
LikeLike
Is the material that the ikea storage table is made of safe for rabbits?
LikeLike
This is really cool! Do you know about how much you spent?
LikeLike
how much total did it cost? sorry, I skimmed through this and you probably already said the price
LikeLike
First bunnies don’t need a water bottle, they need a bowl. The average rabbit drinks the same amount as a large dog. Second there is not enough floor space for rabbits. Happy bunnies love to do side flips and run. An Xpen is much more appropriate for rabbits if you can’t house train them. I free roam my bunny. All he needs is a litter box and a water bowl. Much cheaper and much more humane. When he was a baby I had an xpen for him while he was learning good behavior. Now he just chills wherever I am.
LikeLike
My bunnies have both a water bowl and a bottle (they only rarely use the bottle) and are free-roaming. This is merely their palace. The shyer of the two likes to retreat to the bedroom from time to time. They definitely enjoy having their own territory (and will grunt to defend it if an annoying human chooses the wrong moment to try and clean it).
LikeLike